I used to leave my computer on all the time – just so that I don’t have to wait for it to start. Then, I upgraded my computer. As part of the upgrade I switched from Windows XP to Windows 7. What I noticed is now my computer goes to sleep automatically when I don’t use it. I think this is great for saving electricity.
Here is how to make sure that Windows 7 puts your computer to sleep automatically.
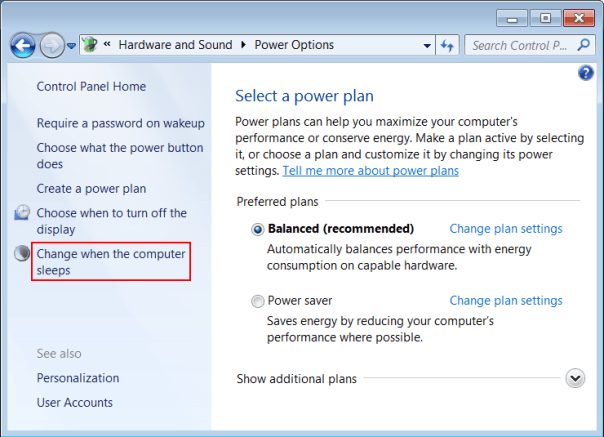
Click Start button, open Control Panel.

Open ‘Hardware and Sound’ category.

Open ‘Power Options’.

Click ‘Change when the computer sleeps’.

Set ‘Put the computer to sleep’ to 20 minutes.

The default is 30 minutes which is reasonable; 20 minutes is even better. Click Save Settings. Now if you don’t use your computer for 20 minutes it will go to sleep automatically.
While you there click ‘Choose what the power button does’ …

… and select ‘Sleep’ option.

I like to be able to quickly put my computer to sleep when I know that I finished for today. Also, when my kids were small they liked to press the power button just to see what will happen. Usually this resulted in Windows starting to shut down the computer and closing half of the programs before getting to some editor that would ask if I want to save the document before closing it.
The computer uses very little energy in sleep mode but starts up very quickly and in exactly the same state as you leave it. Another cool benefit is that you can wake it up by pressing any key or clicking the mouse. Keep in mind that you still need to shut down your computer if you want to unplug it. If your desktop computer loses power while it is in the sleep mode it would reset its state: all open programs and documents would be abruptly closed. This is why it’s a good idea to save your work when you step away from your computer – just in case of power outage.