Category Archives: Software

Calling PureJPEG and PngCrush from Far Manager

I like to keep images that I upload to blog and websites small and free of metadata (EXIF etc). PureJPEG and PngCrush are two tools that help me to reduce image file size without affecting quality.

I invoke them from Far Manager using F2 user menu:

Far Manager user menu

Here’s how to configure it:

  1. Press F2 to open user menu.
  2. Press Insert key. Select ‘Insert Command’.
  3. Enter ‘j’ as hotkey, ‘PureJpeg’ as label and the following as command:
    “C:\Small Programs\PureJpeg\purejpeg.exe” “!.!”
  4. Press OK to save
Far Manager command to invoke PureJPEG

Far Manager replaces “!.!” with selected file name in double quotes.

I keep small apps and tools in ‘Small Programs’ folder. You might have them somewhere else.

Follow the same procedure for PNG Crush. Use this command:

"C:\Small Programs\Pngcrush\pngcrush.exe" -ow "!.!"

Note the -ow switch – it tells pngcrush to overwrite the source PNG file.

Now you can compress an image file losslessly by simply selecting it in Far Manager, pressing F2 and selecting PureJpeg or PngCrush.

Folder Shortcuts in Far Manager

You can quickly jump to your favorite folders in Far Manager by pressing right Control + 1, 2, 3, 4, 5 and so on.

Adding a shortcut is very simple:

  1. Go to your favorite folder in Far Manager
  2. Press Ctrl + Shift + 1 (or 2, 3, 4, 5, …)

Now you can press right Ctrl + 1 to jump to that folder.

You can view all your folder shortcuts by pressing F9 to open the top menu, then C to open Commands submenu, then D:

I have right Ctrl + 1 assigned to my temp folder, I gave it 1Temp name so that it’s always on top and also to remind me that it has 1 as shortcut. Usually I put there files and folders that I’m going to upload somewhere. I train myself to delete everything from that folder from time to time.

You can assign more than folder to a single shortcut. In this case Far Manager would show you a menu with all folders when you press that shortcut. I have folders that I use from time to time assigned to right Ctrl + 0 (zero). Typically they are so deep in the file system that it would be too long to navigate there the normal way:

Folder shortcuts menu in Far Manager

How to Start Beyond Compare from Far Manager

Beyond Compare is an excellent tool for comparing files and folders. I use it most often during software development.

My weapon of choice for file operations is Far Manager so I decided to make launching Beyond Compare fast and painless. After some experimentation I settled on creating bc.cmd in C:\Program Files\Far Manager folder:

@start "" "C:\Program Files\Beyond Compare 4\BComp.exe" %*

Note the empty string as the first argument to the start command: it wouldn’t work properly without it since the full path to BComp.exe has double quotes.

Now I can compare files from Far Manager by typing

bc file1.txt file2.txt

Usually I use Ctrl+F shortcut to insert full path to the selected file in Far Manager.

Comparing Folders

My next idea was to use some keyboard shortcut to compare Far Manager’s left and right panels. Both Far Manager and Beyond Compare have 2 panels so it’s natural to open and compare folders:

Here’s how to set it up:

  1. Press Ctrl+. to start recording a macro
  2. Type bc, then space, then press Ctrl+[ to insert path to the left folder, then space again, then Ctrl+]
  3. Press Enter. This should launch Beyond Compare. Close it and go back to Far Manager.
  4. Press Ctrl+. to stop recording the macro
  5. Press Ctrl+B to assign a hotkey:

Voila! Now you can press Ctrl+B to launch Beyond Compare and compare folders that you have open in Far Manager. Normally Ctrl+B turns on and off the key bar at the bottom of the window but I never do it. You can still turn it off by opening Options menu, then Interface settings:

Don’t forget to save settings by pressing Ctrl+F9. Happy comparing!

USB eXtensible Host Controller Preventing Computer from Sleeping

Recently I noticed that my desktop computer didn’t go to sleep automatically. I have Windows 10.

As an experiment, I manually put my computer to sleep by opening Start menu, clicking Power button, then Sleep:

My computer went to sleep for about 5 seconds and then woke up without me doing anything.

Common advice to troubleshoot Windows sleep problems is to use powercfg -lastwake command. Here’s the output that I received:

Wake History Count - 1
Wake History [0]
  Wake Source Count - 1
  Wake Source [0]
    Type: Device
    Instance Path: PCI\VEN_8086&DEV_A36D&SUBSYS_50071458&REV_10\3&11583659&0&A0
    Friendly Name: Intel(R) USB 3.1 eXtensible Host Controller - 1.10 (Microsoft)
    Description: USB xHCI Compliant Host Controller
    Manufacturer: Generic USB xHCI Host Controller

Why would Intel(R) USB 3.1 eXtensible Host Controller wake up my computer? I was stuck trying to figure that out. Then I saw a post on Super User website and realized: it’s actually one of USB devices connected to USB host controller that wakes my computer up!

I opened Device Manager and switched view to ‘Devices by connection’:

I had 4 USB devices connected to the host controller:

  • Uninterruptible Power Supply (UPS)
  • Keyboard
  • Mouse
  • Webcam

I bought UPS not long ago so most likely it was the actual culprit. To confirm I disconnected it from my computer and put it to sleep again. This time it stayed asleep as intended. Mystery solved.

In the end I decided to keep UPS disconnected from my computer. Initially I connected it using USB cable so that Windows 10 would automatically hibernate if there is power loss. I’d love to figure out how to configure Windows so that it goes to sleep after 15 minutes of inactivity but wakes up if there is power loss, wait for 1 minute and then hibernates by dumping all memory to disk.

What is Wrong with JSON Viewer on Codeplex

JSON Viewer for Windows (hosted on Codeplex) is a great tool, I use it at least once a week. However it hasn’t been updated since 2011:
about-json-viewer

Here is the list of issues with version 1.2 of JSON Viewer.

1. When you open a large JSON file (more than 10 MB) the viewer freezes for 2-3 minutes, sometimes longer. You have to kill it with Task Manager.

2. When you edit JSON the cursor always jumps to the beginning of the file – very annoying. Making any changes to JSON is essentially impossible.

3. The URLs in JSON look like hyperlinks but clicking on them does nothing:
links-in-json-viewer

4. When you press Ctrl+V in the search field the text gets pasted to the JSON document instead, usually making it invalid!

Did I miss anything?

How to View Large JSON Files on Windows

Let’s say you need to view a huge (more than 1 GB) JSON file. Of course you are not going to view so much data, it’s humanly impossible. What you want to do is to get a general understanding of JSON structure.

I assume that JSON document is already properly formatted.

First of all we will copy first 10,000 lines to a new file. We will user PowerShell for that:

Get-Content large.json -TotalCount 10000 | Out-File truncated.json

Next, open truncated.json in Sublime Text Editor and scroll to the end:
sublime-truncated-json

The JSON is not valid right now. Let’s make it valid by closing all ‘[‘ and ‘{‘ brackets. Sublime Text has a great feature that highlights invalid JSON code:
sublime-invalid-json-highlighted

All you need to do is to try to add brackets alternating between ‘[‘ and ‘{‘ until you reach the first column:
sublime-valid-json

Now you can save the file and open it in JSON Viewer. Since the new file is small you should have no problems viewing it as tree:
json-viewer

By the way, I’m thinking of building a tool that would automate this process – leave a comment if you’re interested in learning more.

Viewing JSON

From time to time I need to examine data in JSON format. Now unformatted JSON is very hard to read, for example:

{"movies":[{"id":"770739679","title":"Captain America: The First Avenger","year":2011,"mpaa_rating":"PG-13","runtime":121,"critics_consensus":"With plenty of pulpy action, a pleasantly...","release_dates":{"theater":"2011-07-22"},"ratings":{"critics_rating":"Fresh","critics_score":71,"audience_score":96},"synopsis":"Captain America: The First Avenger will focus on the early days...","posters":{"thumbnail":"http://content9.flixster.com/movie/11/15/83/11158339_tmb.jpg","profile":"http://content9.flixster.com/movie/11/15/83/11158339_tmb.jpg","detailed":"http://content9.flixster.com/movie/11/15/83/11158339_tmb.jpg","original":"http://content9.flixster.com/movie/11/15/83/11158339_tmb.jpg"},"abridged_cast":[{"name":"Chris Evans","characters":["Captain America/Steve Rogers","Steve Rogers / Captain America","Steve Rogers/Captain America"]},{"name":"Hayley Atwell","characters":["Peggy Carter"]},{"name":"Sebastian Stan","characters":["Bucky Barnes","James Buchanan \"Bucky\" Barnes"]},{"name":"Tommy Lee Jones","characters":["Colonel Chester Phillips"]},{"name":"Hugo Weaving","characters":["Johann Schmidt/Red Skull","Johann Schmidt/The Red Skull","Red Skull"]}],"alternate_ids":{"imdb":"0458339"}}

I usually use JSON Viewer to format JSON:

{
    "movies": [
        {
            "id": "770739679",
            "title": "Captain America: The First Avenger",
            "year": 2011,
            "mpaa_rating": "PG-13",
            "runtime": 121,
            "critics_consensus": "With plenty of pulpy action...",
            "release_dates": {
                "theater": "2011-07-22"
            },
            "ratings": {
                "critics_rating": "Fresh",
                "critics_score": 71,
                "audience_score": 96
            },
            "synopsis": "Captain America: The First Avenger will focus...",
            "posters": {
                "thumbnail": "http://content9.flixster.com/movie/11/15/83/11158339_tmb.jpg",
                "profile": "http://content9.flixster.com/movie/11/15/83/11158339_tmb.jpg",
                "detailed": "http://content9.flixster.com/movie/11/15/83/11158339_tmb.jpg",
                "original": "http://content9.flixster.com/movie/11/15/83/11158339_tmb.jpg"
            },
            "abridged_cast": [
                {
                    "name": "Chris Evans",
                    "characters": [
                        "Captain America/Steve Rogers",
                        "Steve Rogers / Captain America",
                        "Steve Rogers/Captain America"
                    ]
                },
                {
                    "name": "Hayley Atwell",
                    "characters": [
                        "Peggy Carter"
                    ]
                },
                {
                    "name": "Sebastian Stan",
                    "characters": [
                        "Bucky Barnes",
                        "James Buchanan \"Bucky\" Barnes"
                    ]
                },
                {
                    "name": "Tommy Lee Jones",
                    "characters": [
                        "Colonel Chester Phillips"
                    ]
                },
                {
                    "name": "Hugo Weaving",
                    "characters": [
                        "Johann Schmidt/Red Skull",
                        "Johann Schmidt/The Red Skull",
                        "Red Skull"
                    ]
                }
            ],
            "alternate_ids": {
                "imdb": "0458339"
            }
        }
    ]
}

Much better isn't it?

JSON Viewer is great because it also shows JSON in a tree:
JSON Viewer

Now I can easily expand and collapse elements and quickly understand the structure of the data.

However there is one problem: JSON Viewer doesn't handle large files well. If I try to open 4 MB file it just freezes for few minutes and I have to kill it with Process Explorer.

Do you have the same problem too? How would you like to see the problem solved? Please answer as a comment below.

My First Electricity Calculator

I have built my first online electricity calculator. It’s very simple and there are lots of similar calculators out there but it’s a start.

Behold: Electricity Calculator

Here’s how it works. Let’s say you are wondering how much it would cost to run a nightlight if you leave it on all the time. This nightlight has 0.2 watt LED, so you enter 0.2 as wattage.

nightlight

Next you enter 24 as the number of hours per day. Here in Australia we pay 30 cents per kilowatt-hour on average. The calculator gives you the result: the running cost would be $0.53 per year.

Electricity Calculator

Another example. We have 6 light bulbs in our kitchen. They are CFLs (of course) and 14 watt each.

light-bulb

So in total they use 6 * 14 = 84 watt. We have them on for about 3 hours per day. We pay 40 cents per kilowatt-hour. According to the calculator the kitchen lighting cost us $3.02 per month or $36.79 per year.

electricity-cost-lighting

How to Configure Windows 7 to Put Your Computer to Sleep Automatically

I used to leave my computer on all the time – just so that I don’t have to wait for it to start. Then, I upgraded my computer. As part of the upgrade I switched from Windows XP to Windows 7. What I noticed is now my computer goes to sleep automatically when I don’t use it. I think this is great for saving electricity.

Here is how to make sure that Windows 7 puts your computer to sleep automatically.

Click Start button, open Control Panel.
start-menu

Open ‘Hardware and Sound’ category.
control-panel

Open ‘Power Options’.
hardware

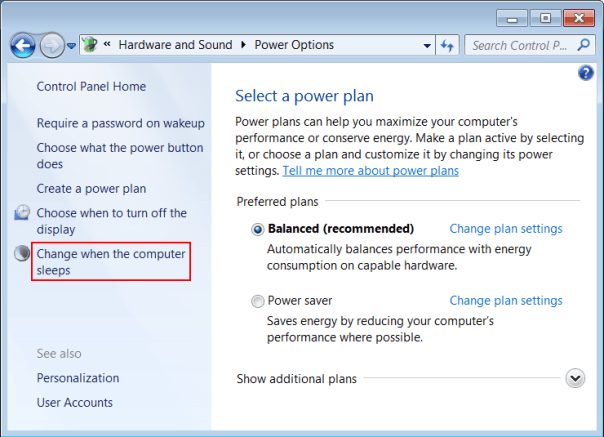
Click ‘Change when the computer sleeps’.
power-options

Set ‘Put the computer to sleep’ to 20 minutes.
plan-settings

The default is 30 minutes which is reasonable; 20 minutes is even better. Click Save Settings. Now if you don’t use your computer for 20 minutes it will go to sleep automatically.

While you there click ‘Choose what the power button does’ …
power-options-power-button

… and select ‘Sleep’ option.
power-button

I like to be able to quickly put my computer to sleep when I know that I finished for today. Also, when my kids were small they liked to press the power button just to see what will happen. Usually this resulted in Windows starting to shut down the computer and closing half of the programs before getting to some editor that would ask if I want to save the document before closing it.

The computer uses very little energy in sleep mode but starts up very quickly and in exactly the same state as you leave it. Another cool benefit is that you can wake it up by pressing any key or clicking the mouse. Keep in mind that you still need to shut down your computer if you want to unplug it. If your desktop computer loses power while it is in the sleep mode it would reset its state: all open programs and documents would be abruptly closed. This is why it’s a good idea to save your work when you step away from your computer – just in case of power outage.

See also: Sustainable Computing: Sleep or Hibernate?

Front Page with a Big Image in WordPress

I’m going to continue with setting up my photography website using WordPress and Twenty Twelve theme (see the first post in the series).

As a reminder, this is how the home page should look like:
Home page mockup

By default, WordPress shows latest blog posts on the home page of your site. Here is how to make it to show a single page instead. First, go to WordPress dashboard and click ‘Pages’ in menu on the left:
wordpress-pages-menu

Then, click ‘Add New’ link:
add-new-page-link

Enter ‘Home’ as a title and leave /home as a permalink:
add-new-page

Select ‘Front Page Template’ in page attributes section on the right. Otherwise you will get a sidebar on this page.
page-template

Click ‘Publish’ button. The page is ready, now it’s time to make it the home page. Go to Settings, then Reading:
reading-settings

Change ‘Front page displays’ setting to a static page and select ‘Home’ as front page:
wordpress-front-page

Here’s the result:
front-page-no-image

Our home page is almost ready. Now it’s time to add a big image to it. Go to Pages, then All Pages and click Edit link for the Home page:
all-pages

Click ‘Add Media’ button:
add-media

Switch to Upload tab and select your file. The optimal image width for Twenty Twelve theme is 960 pixels. However you can upload a bigger image – WordPress will resize it automatically. The height doesn’t matter but I like image proportions to be close to the golden ratio.

Once upload is finished set the ‘Link To’ to None and Size to ‘Full Size’ under attachment display settings:
attachment-display-settings

Click ‘Insert into page’ button. The image is in the post but WordPress helpfully made it fit its default column size (625 pixels). Switch to Text tab and remove width and height attributes from the img tag:
img-width-height

Now set template to ‘Full-width Page Template, No Sidebar’ and click Update button.

Voilà, home page in WordPress with a full-width image:
home-page-with-full-width-image

You can view result live: Acme Photography.